DIY wedding gift!

06:30 Natalie Karine 0 Comments


Hello friends! I wanted to share a special gift that I made for my friend Naomi who recently got married. Before I show you, let me tell you a little bit about her.... For the past two years, Naomi has had major challenges with her health (Check out the little video I made for her fundraiser). Nonetheless, she lives every day seeking peace & beauty, enjoying every moment offered. She is grateful for the things in her life (including her long lost love whom she just married...Hollywood movie or what?!) and has such a positive attitude.

Little lady you inspire me! ♥
xo


Some inspirational bunting with one of her motos:
"Live every moment"
bunting tutorial here
other inspirational bunting here
Handmade wreath. Wanna make one?
Simply follow these instructions!
Hand carved stones that made me think of her!
Getting all wrapped up!
Leopard paper and a handmade card you can see here
The beautiful bride on her wedding night!
I hope every day brings you joyful moments, laughs and love! xo

0 commentaires:

DIY cards,

DIY Gift: Wedding Map!

15:36 Natalie Karine 0 Comments

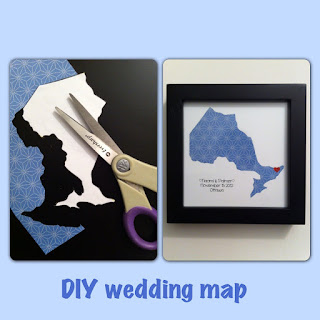
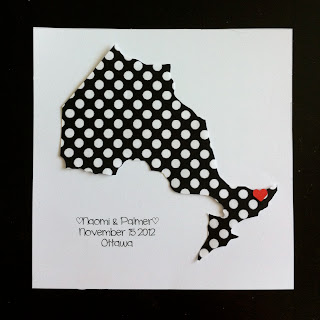
 Hi there! My beautiful friend Naomi got married last week and I wanted to make her a beautiful handmade gift full of love. So I started with a handmade card! I call it a "wedding map" and it's oh-so easy to do! I even made a second one which I framed and included with my gift! Wanna make one?

Materials
❤ white cardstock
❤ patterned paper & red paper
❤ glue stick
❤ scissors
❤ pencil
❤ printer & computer
❤ outline of the province/state in which the wedding is taking place.
DIRECTIONS ①  Type out wedding info : the name of the couple, date and city of the wedding and print onto a  sheet of white cardstock. ② Print and trace the shape of the province (or state) were the couple is getting married. ③ Cut it out and glue onto the cardstock. ④ Add a heart on the city where they are getting married (here, the happy couple got married in Ottawa .Ontario)! Hooray!
The finished product.... framed!
the polka-dot version!
Having so much fun with stencils these days!
Want more stencil cards? Check out my Real Dear thank you cards!

0 commentaires:

DIY crafts

Fridge Friends!

15:11 Natalie Karine 0 Comments


Hi there! A friend of mine recently celebrated a birthday and I wanted to make him a special gift! So I decided to make him a slighty creepy gift that I titled fridge friends! I printed tiny images of his favorite people onto iron-on transfer paper and placed it onto colourful fabric. Then I covered some buttons with the decorated fabric and glued a magnet on the back! It's basically Fabric-Covered Magnets...with pictures! Now, we can always all hang out...on his fridge!

Hooray!
After ironing-on the images, to cut them in small circles!
Getting all wrapped up!

0 commentaires:

DIY cards

Real Dear Card!

07:33 Natalie Karine 0 Comments

Hi there! I wanted to share with you a cute card that I made for a friend who's so incredibly sweet and is truly a blessing in my life. So I found this cute card that said "You've been a real dear" and decided to create my own! Wanna make one too? Just print, cut and trace the simple deer stencil at the end of the post! I love this cute deer so much that I might make him part of my holiday cards this year... stay tuned!

xo Natalie
craft time!


Simple deer outline to print and cut!

0 commentaires:

DIY cards

Yummy Card!

10:16 Natalie Karine 0 Comments

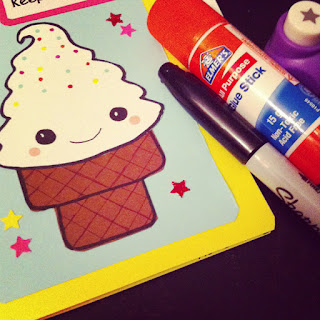
Hi there! I just wanted to quickly share the card I made for my awesome friend Stephen! His reaction was: "Oh an ice cream cone because I'm so cool right?! I was thinking more "sweet" but yeah he's pretty cool too! I even made an easy step-by-step illustrated tutorial if you wanna try. All you need is some basic drawing skills and a couple supplies!

 What you'll need:
      ★ coloured paper/cardstock,
      ★ markers,
      ★ scissors
      ★ glue


collage supplies!
Ajouter une légende
Happy crafting! xo

0 commentaires:

DIY crafts

Geometric Tape Painting!

06:33 Natalie Karine 1 Comments

Hi there! As you might know, I loooove making handmade gifts for people...I just love the personal touch and the love & energy that goes into making them. Last week, it was my brother's birthday and I decided to make him a painting. I found this awesome tutorial online and decide to give it a try! Oh and I recycled an old canvas! Double points! Wanna try? It's so easy!

   Materials:
      ❖ Canvas
      ❖ Acrylic paint (various colours)
      ❖Paintbrush
      ❖ Silver acrylic paint (or spray paint)


Instructions:
① Paint your entire canvas silver (or gold) using either crafter's acrylic paint or spray paint if you have access to a well ventilated area. Let dry and add a second coat if needed. 
② Cut long strands of tape and create various "sections" on the canvas. Have fun with diagonal lines!
③ Paint each section/shape a different colour! Let dry.
④ Remove the tape and voilà! Your very own modern geometric painting!
   

Before and after the paint removal!
Looks great! 
  Happy painting! xo


1 commentaires:

DIY crafts

Cute Button Earrings

17:42 Natalie Karine 0 Comments

Hi there! I wanted to share this quick & easy project I did last weekend while i was home with a cold.  All you need is a pair of fun buttons (the ones with holes at the back work better for this project )and you can transform them into fun earrings! So easy and you get awesome unique creations from recycled materials! win win!

     Materials:
       ✔ 2 matching buttons
       ✔ Thick super glue
       ✔ Pincers
       ✔ Earring post with flat pad

Have fun! xo
1. Snip the back off the button. 2. Glue earring posts and let dry! Oh my goodness... that's it, you're done!

0 commentaires:

DIY crafts,

DIY Felt Cases

17:19 Natalie Karine 0 Comments


 I found a post for easy to make Felt cases the other day when I was browsing the interweb! I decided to make a couple for the classroom! They take about 5 minutes to sew and my students helped me sew on the buttons! Check out the tutorials on the Martha Stewart Website:

          ✄ Felt Cases 
          ✄ Felt Pencil Case 

Enjoy and happy crafting! xo
Pencil case with button!
The alphabet!
Perfect for flash cards!

0 commentaires: