School/kids crafts

Magic Potion!

10:37 Natalie Karine 0 Comments

Hi there! Today, we had a Halloween-themed day for our "funky Fridays" (because, why not!?) and we made some magical wands and magic potion!

For the wands we used cardstock and ribbons, as well as a branch or shishkabob stick.

Then we said a magic spell and watched as our potion came to life. We used a vinegar solution with food coloring in it and mixed in some baking soda! I found this nice little video and it looks like if you add in some dish soap, it'll even bubble! I wish I would've known!
Materials: a jar, a spoon, vinegar, baking soda, food coloring (optional: dish soap)

0 commentaires:

School/kids crafts

Rockstar microphone!

10:10 Natalie Karine 1 Comments


Hi there! Last week, we had a special Rockstar/Popstar day and we made microphones from toilet paper rolls! They are super easy to make, and the kids loved them!

Materials :
♪ toilet paper roll (tube)
♪ black paper
♪ foil
♪ tissue paper or newspaper (to crumple up and make a ball)
♪ decorative paper!

Instructions:
*note, instead of using a whole bunch of foil, we made a ball of tissue paper and wrapped it in foil!
We got dressed up!
Even distance-learning can be fun! We had a karaoke sing-a-long with our microphones through Google Meet!

1 commentaires:

CricutMaker

Gardening Apron

10:16 Natalie Karine 1 Comments


Hi there! This morning I did a virtual math lesson and we were using seedling trays to count in rows and groups! So I just had to dress up like a gardener!

I hade some black aprons I had bought at walmart in a 3 pack from the crafting sections. So I hopped on Design Space and used their adorable images to come up with this design. Feel free to use my Cricut file if you have Design Space! The kids thought I looked ike a real garderner!
a quick iron-on!
Arrays ar a great way to start thinking of multiplications
4 + 4 +4 = 12 or 3 x 4 = 12
Looks great!

1 commentaires:

School/kids crafts

Little Toilet Paper Rooll Robots

09:16 Natalie Karine 0 Comments

The one on the left is hand-drawn, the right uses the prinout!
Hi there! This week we are reading a funny little stroy about a magical robot in French class, so I thought the kids could invent their own little guys! I actually have motors and everything at my place, but since class is virtual these days, toilet paper rolls it is! I'm trying to come up with crafts that the kids can do at home with things they probably have. The inspiration came from this post I found. The kids can print the sheet with all the robot body parts, or draw their own on a sheet of paper!
Here's what you'll need:
  ⚙ Toilet paper roll
  ⚙ Foil
  ⚙ Scissors
  ⚙ Glue
  ⚙ Printout or paper & black marker
Cover your tube with foil and look at all the different combos!

0 commentaires:

School/kids crafts

Paper Frog Puppet

07:18 Natalie Karine 1 Comments

Hi there! Check out this cute little paper frog hand puppet! I'm trying to do an easy paper craft or two a week with with my now on-line classroom, so that the kids aren't working all the time. We do a sound of the, en Français, and this week was G/J. So we made a nice frog eating cake = Une gentille grenouille qui mange du gateau. They turned out so cute! Wish I wouldve taken a creen capture of all their little frogs during our Google Meet video-call! The craft was inspired by this Blog Post I found on Pinterest. Theres' a great video showing you how to fold the paper!


Here's what you'll need:
    🐸 construction paper
    🐸glue
    🐸scissors
    🐸markers


The kids loved it!

1 commentaires:

Poisson d'avril!

11:47 Natalie Karine 0 Comments


Hi there! Its April 1st! In French, April Fools is "Poisson d'avril" which basically means "April Fish". We love sticking fish on people's backs and playing tricks! Today, during a video chat with my students (schools are still closed for a while), we made some great fish! I found the instructions for the 3D one here (in French, but the images are easy to follow). Also, check out these sweet PDF files to colour!

0 commentaires:

School/kids crafts

Monster Flowers!

11:40 Natalie Karine 1 Comments

Hi there! The other day, I made some awesome monster flowers with my students (through a video chat!) To celebrate spring! They turned out so great! 

Materials:
► construction paper or cardstock
► markers (or a black sharpie)
► scissors
► glue
► stem (pipe cleaner or stick)


Here are the steps! 
1. Cut out two identical circle and add a monster face! 2. Cut 6 strips of paper. 3. Glue the two ends a strip together  in order to make half a bow. 4. Repeat for all 6 strips. 5. Glue behind the monster face and then glue 2nd circle on top. 6. Add a stem!

What a nice looking bouquet!

1 commentaires:

CricutMaker,

African Animal Collage

03:55 Natalie Karine 0 Comments


Hi there! In our grade 2 social studies unit, our second unit is on the countries of the world. This week we explored two countires in Africa (Côte d'Ivoire and Mali) by watching documentaries to discover the differences with their ways of living. to finish this section off (next week: Japan!), I decided to make a craft with the kidos! I pre-cut all the black animal silhouettes using my Cricut Maker, and if you have one, you can follow my link here.


Here's what you need to make this craft:
■ thick cardstock 4x6 (for the backing)
■ black, red, orange and yellow cardstock (or construction paper)
■ black marker
■ scissors
■ glue
Step 1: rip strips of paper
Step 2: glue all the layers down. Make sur the ripped edges show!
Step 3: DETAILS! Add some animals and draw some trees!
Voilà!

0 commentaires:

DIY crafts

DIY Heart Wrapping Paper

05:03 Natalie Karine 0 Comments

Happy Valentine's Day!  Yesterday, I decided to make my own Valentine's Day wrapping paper for my husbands little gift. It turned out great. All I needed was some brown kraft paper and some heart stamps + stamp pads. And the best part ? It can be recycled!
Turned out so great!

Perfect with my little handmade card!

0 commentaires:

CricutMaker,

Valentine's Bear Pencil Toppers

03:32 Natalie Karine 0 Comments

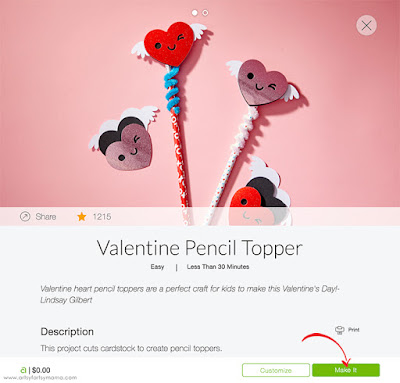
Happy Valentine's Day! I had such a fun time putting together this craft for my students. Instead off making them a card, I decided to make them a small encil topper with a message on it. I even managed to make it bear shape, since that's our class animal. The inspiration came from a project in the Cricut project bank that featured a heart pencil topper. I hope the kids love them!

In case you have a cricut and you're looking for the original project, you can search "Valentine Pencil Topper". Here's what it looks like: 

0 commentaires: