CricutMaker,

Happy New Year Banner!

11:50 Natalie Karine 0 Comments

Hi there! We are having a few friends over for new year's eve tonight and I thought that I would play around my my Cricut and make a banner. I usually make little triangle pennant banners, so I thought I'd try something new, something I could only do with the Cricut... so I decided to make some detailed cursive words, after getting some inspiration from Pinterest. I used the "Babette" cricut font for the words and "Padigton regular" for the numbers.

Loved how it turned out!

My Cricut in action!
Made two copies of the words, so that I could sandwich
 the string in-between the 2 layers.
Gluing my string with Tacky glue
So pretty over the Mantle and fireplace!


0 commentaires:

CricutMaker

Craft Room Reorganization!

11:41 Natalie Karine 0 Comments

Hi there! I've been having fun reorganizing my craft room and searching Pinterest for some inspiration! You see, my AMAZING husband bought me a Cricut Maker for Christmas and I have to find a way to hang all my accessories, because my crafting is about to reach a new level!
 I found this sweet video by Sea Lemon that really sold me on the Ikea Skadis Pegboard system. Then my husband helped me put it up... and voilà! A space to hang all my new crafting tools!
Jeremy putting up the boards!
Loving the little shelves for my jars
The little clips and "paper holder" are great!
What a perfect set-up!

0 commentaires:

School/kids crafts

Paper Reindeer and Elf

17:41 Natalie Karine 0 Comments

 Hey there! Those who know me know that I love crafting with toilet paper rolls. There are just so many little creatures you can make... and they stand up! I made these two examples for my students and they invented their own versions! This craft turned out so cute! It sure was a challenging craft with a need for hot glue, but it was well worth it.

Look at these cute reindeer.

One student even made a Santa!

0 commentaires:

DIY crafts,

Milk Carton Gingerbread House

16:40 Natalie Karine 0 Comments

Hi there! It's the last week of school and we are very busy crafting! The students finished their gifts for their parents yesterday, and they are just ADORABLE!

We made little gingerbread houses from milk cartons (that the kids drink at school) and then popped in a little electric candle to turn them into little glowing homes! So cute!

Make sure to clean them really well and let them dry before starting the craft.


We sanded the milk cartons to remove the wax, then painted them brown.
After, we cut out 3 windows and a door ( to insert the candle)
We glued the tops shut to make the roofs.
We cut out the scalloped roof and layered it up!
The kids decorated the house with pompoms, foams stickers and glitter!
Here is the template I created for the roof. :
I photocopied this on 8.5 x 11 letter sized paper.

0 commentaires:

DIY cards

Xmas cards for my students!

10:13 Natalie Karine 0 Comments


Hi there! It's that time again... time to make some cute little cards for the little people I share my days with. I decided to redo last year's cards again as our class animal this year is the bear... How fitting! On the last day of school, I'll place these cards and a fun holiday pencil on their desk! Joyeux Noël!

0 commentaires:

DIY crafts

Handmade Christmas: Hot Coco Ornament

10:16 Natalie Karine 0 Comments

I love this hot coco mug ornament! I won't lie, this is not a kid-friendly project. It took me awhile to do and I made a bit of a mess with my Modge Podge. Nevertheless, I love how they turned out! Check out the tutorial on Mega Crafty!

More of my Handmade Christmas ornaments: More Handmade Christmas decorations: Paper chainsCute Clothespin Reindeer, Paper ball Ornament

0 commentaires:

DIY crafts

Handmade Christmas: Paper Chain

10:00 Natalie Karine 0 Comments

I'm just loving this year's Handmade Christmas theme we have going on at home! Instead of putting our usual ribbon in our tree, we decided to do something different.. and handmade! My husband and I talked about popcorn garland, pompom garlands, but those wouldn't "fill out" the tree like we wanted. Then my husband suggested paper chain. My first thought was "like my students make?!". But we decided to put a new spin on it. We took a book that was in the donate bin and decided to cut it into nice 2cm strips. Then, we made a beautiful  (super long) paper chain with a vintage vibe. We just love it!


cut of a bunch of 2cm strips with my paper cutter.
Looks great!

More Handmade Christmas decorations: Paper Ball Ornament, Cute Clothespin Reindeer, Hot Coco Ornament

0 commentaires:

DIY crafts

Handmade Christmas: Paper Ball Ornament

09:52 Natalie Karine 0 Comments

Hi there! Some of you may know that my husband loves Christmas and likes to have different themes for our tree. This years' theme is "Handmade Christmas". I love it! Everything on our tree is handmade! We have bought a few hand painted or hand made ornaments in stores, but the rest is mostly made by me! I love it!
So I'd like to start byt showing you our handmade paper balls. I bought a special 2.5in hole punch and we made a whole bunch. My students loved the craft too! There's a bunch of tutorials on Pinterest. But they are so easy!

Instructions:

1. Cut (or punch) 6 circles.

2. Fold them in half, pattern side, inside the fold.

3. Glue back-to-back, one half at a time.

4. Before closing, insert a looped string.

5. Voilà!

Glue each half back to back
So many ornaments!
Looks great next to our paper chain!


More Handmade Christmas decorations: Paper chains, Cute Clothespin Reindeer, Hot Coco Ornament

0 commentaires:

School/kids crafts

Fall Paper Wreath

18:19 Natalie Karine 0 Comments


Hi there! We made some cute paper wreaths this week. I got inspired from my leaf cutouts and garlands that are hanging in my windows in my classroom. Look how cute these turned out!


0 commentaires:

School/kids crafts

Thanksgiving Turkey Leaf Craft

18:16 Natalie Karine 0 Comments

Hi there! We made some adorable turkeys at school today with some pretty dried leaves and toilet paper roll. I traced the bodies on cardstock for my students (inspired from this website), but they put the rest together!


Used some beautiful fall leaves!
These look ADORABLE!


0 commentaires:

DIY crafts,

Hand-Painted Cottage Signs

12:36 Natalie Karine 0 Comments

Hello again! I've already started to get ready for back-to-school. This year, I'm leaving my classroom and headed into a portable, outside the school. I decided to call my new classroom a "cabin". Sounds a little more fun than "portable". Then I decided to make these signs for all the "cabins" that we'll hang in the inside of the windows, facing the school yard! They will look so cute with my Flannel Bear Pillows! I promise to take a pic once they're up

To make this project, I found this nice piece of wood that was stained gray at the hardware store. It was 12 feet long, so I cut it into four 3-foot pieces. All for $12! Afterwards, I stained them white and did some light sanding when they dried.

 Then, I wrote what I wanted on my computer and printed it out. I rubbed pencil behind my sheet of paper to turn it into graphite transfer paper.

 Once the words were transferred on my piece of wood, I painted it in with acrylic paint.
I added little details little a little pennant banner and some stars. I also stapled a string behind to be able to hang it. I can't wait to show my colleagues!

0 commentaires:

DIY crafts

DIY Fairy Light Lanterns

12:00 Natalie Karine 0 Comments


Hi there! I wanted to share my fun little lanterns I made for my wedding reception! I wanted to hang little white lights all over the patio where we were holding our reception, but we could only have centerpieces, so I decided to put my little white light in the middle of the tables!

What you'll need:
- mason jar with lid
- fairy lights (i got mine on amazon for about 2$ a pop!)
- tape

Instructions:

1. Tape the battery back inside the jar lid.
2. "Stuff" the light string inside the jar.
3. Turn on and close the lid. voila! Looks awesome!
A pic of  the jar lantern at my reception.. Love it!

0 commentaires:

Sewing

DIY Fabric Book Covers!

11:11 Natalie Karine 0 Comments


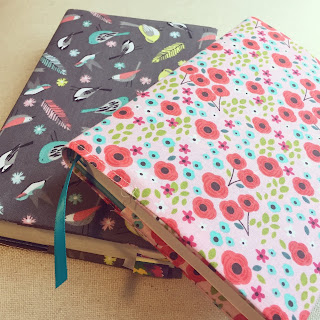
Hi there! I've been having fun with my scraps of fabric! I covered a book and a journal too. The best part is that you only need a little piece of fabric to make these easy book covers. Check out one of my old posts for the instructions or simply just watch the video tutorial here

almost no sewing, but lots of folding and pressing!
lovely!

0 commentaires:

Sewing

Flannel Bear Pillow

07:01 Natalie Karine 0 Comments

Hi there! I’ve been busy making an awesome bear pillow this morning! Next year I’m moving to a portable classroom, outside, so I’ve decided to transform it into a cabin. On top of that, our school theme is the canadian forest... how perfect is that?! Every class chose an animal. For my grade 2 class, I chose the bear! Perfect for my whimsical cabin!

Yesterday, i went to Fabircland and bought some brown flannel to make my bear pillows, inspired from this link I found on Pinterest. So soft and cozy! I ended up using a 14inch zipper, which bunches a little. For my second one, I’ll use a different one!

I started crafting some things, but I’m so excited to get in my class in a couple weeks! Stay tuned! 

Hand stiching the face features!
The face is all done! Cute!
Took an old throw cusion and made it round. Ready to stuff it!
Also made this little guy out of the scraps of flannel!


0 commentaires: