DIY cards

DIY Potato Stamp Snowman!

07:04 Natalie Karine 0 Comments

Hi there! It's been a while since I posted on here... I've been a busy bee!
I made a whole bunch of these little cards for my friends, family and students (I'm in a wonderful grade 3 class now!). My original idea was to use a potato stamp, but I didn't have any, so I made a round foam stamp instead with fun foam and a bottle lid! Check out my DIY foam stamp tutorial here.

Wanna know how to make these cute snowmen? Check this out! 


 Materials:
    ❄ Coloured cardstock
 ❄ White paint
    ❄ Foam stamps
    ❄ Sharpies (black and orange)
    ❄ Washi tape (with patterns)
    ❄ Glue stick
    ❄ Scissors 


Instructions:
① cut a square card from cardstock. ② Stamp a circle with half a potato or foam stamp dipped in
white acrylic paint. ③ When the paint is dry, add details with Sharpies: arms, eyes, mouth
and nose. ④ Add a little border with colourful washi tape! 
Voilà! You can even add little stamped hearts!
I slipped in a cute little message i prepared on the computer!
DIY foam stamps with fioam and a bottle lid instead
 of a potato or store-bought stamps!
So many cards!!

0 commentaires:

School/kids crafts

Friday Craft: Creature Bookmarks

06:30 Natalie Karine 0 Comments


Hey guys! It's been a while! I've been so busy starting the year in a grade 5... And making crafts, of course! Early in the year, i decided that every last period on Friday afternoon would be a "free period". I don't wanna teach and the kids are tired too! So I've started organizing Friday Crafts. The kids can do them if they want, or play a game or whatever. But let me tell you, these are crazy popular! It's also a nice challenge for me finding crafts for older kids (I'm used to preschool)!


One of our first Friday crafts was these origami creature bookmarks. I found the instructions on Pinterest and loved them instantly! So easy  to make and a HUGE hit. I think one girl made 10! Haha!

 
My little fox! (We had listened to what does the Fox say?)


       Materials
  ➼ colored paper or thin construction paper
  ➼ white printer paper
  ➼ black sharpies
  ➼ glue
  ➼ scissors


       Instructions found here

You can make them all different!

0 commentaires:

School/kids crafts

City Map...with tape!

17:46 Natalie Karine 0 Comments

I've been spending my summer in a pre-kindergarten program, getting 3 & 4 year olds all ready for September with some half days of school! I'm looking forward to upcoming my weeks off, (2 weeks to go) but I'm having lots of fun with these cuties!

We have a BUNCH of blocks for building in the classroom, so I wanted to create something to encourage the kids to try different things out. I found this amazing idea on Pinterest: making "streets" out of tape so that the kids can add buildings all around! They got it right away, and started to trace the lines with their fingers! Awesome and crazy cheap. I used fun red tape, but green painters tape would work as well! 


Masking tape streets on a table!
Now some added buildings with wooden blocks!

One kid even started sorting the blocks by color Awesome!

0 commentaires:

School/kids crafts

Sunprints!

18:02 Natalie Karine 0 Comments

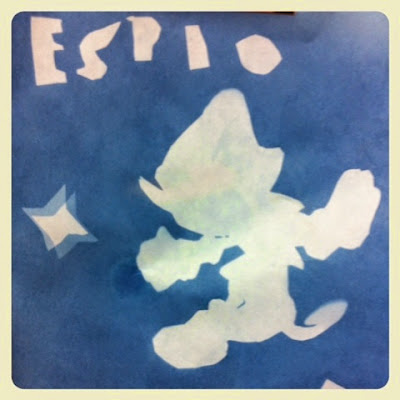
Yesterday, we had an epic craft/science afternoon in grade 5. We made sunprints and the kids loved it. I used to do this activity all the time when I worked at the Canadian museum of contemporary photography and it was always a big hit. The scientific name for it is cyanotype, but it's basically special paper treated with a UV light sensitive material. It makes a print of whatever you put on it, exposing the paper that isn't covered (which is very similar to a negative film). You can purchase the paper on this website and it's so worth it! For young and old! :)

Check out the complete instructions here

Sooooooo many different compositions! WOW!
This student even cut out his favorite video game character! Awesome!

0 commentaires:

School/kids crafts

Shrink Art Creations!

17:18 Natalie Karine 0 Comments

Hey there! We've been crafting up a storm at school this past week. The kids are all done their work for the year so I've been bringing in all my special craft supplies! The kids LOVED this project. They got to find their favorite stuff on the internet and then trace it onto their piece of Shrink Art! We had everything from kawaii cupcakes, kitties to FIFA soccer balls. Then, we added a little string and a key-ring and turned them into keychains after! Hooray!

Materials: coloring pencils, black sharpie, scissors, key-rings, hole puncher and Shrink Art (or Shrinky Dinky, found at you local craft store).


Instructions:
① Draw your image on the rough side of your Shrink Art piece. It's it transparent, place your favorite image underneath and trace it!
② Trace the outline with a black sharpie.
③ Cut your shape out and punch a hole. *Don't forget this step. It'll be impossible to do once it's shrunken and thicker.
④ Bake at 325°F for 30 seconds or until completely shrunken.
⑤ String it onto a key-ring and voila! You're done!

You can also check out these older post on Shrink Art: Hand Keychains and Necklaces!

All the awesome creations! Look at these little creative geniuses!

Before it gets shrunken! Amazing!


0 commentaires:

DIY cards

DIY Hamburger Card!

08:35 Natalie Karine 0 Comments

Hey there! It's Sunday morning and it also happens to be Father's Day so why not get my craft on?! I let summertime and BBQs inspire me for these handmade cards. I even did this fun card with the kids at work too and they loved it! Some made extra cheesy-cheeseburgers and a some made burgers with 3 patties! Awesome!

Materials
✂ Colored car stock (red, orange, yellow, brown and green)
✂ Glue
✂ Scissors 
✂ Googgly eyes 


Perfectly paired with giftcards for Dad's favorite things!

0 commentaires:

DIY cards,

Floating Birds Card

15:04 Natalie Karine 0 Comments

Hi there! It's been a rainy day over here... Perfect for crafts! So I made a bunch of cards today! Yay! I even made a (French) Mother's Day card for my mama and i intend to make the same craft with my students this week, complete with bird outlines to print! Now adorable bird or cute owl? I love these little guys holding up balloons! How to choose?!

Materials
 ❀ Colored cardboard 
 ❀ Scissors
 ❀ Glue 
 ❀ Thin black marker
 ❀ Bird outline


Little blue bird

And owl too! Look at the little guys floating away!
Printable bird file!

0 commentaires:

DIY crafts,

Easter Collage Bookmarks

10:27 Natalie Karine 0 Comments

Hi there! Happy Easter! For the past month I've been supplying in a grade 5 and we haven't been crafting too much... More like lots of Math and French! However, with Easter being this weekend, I decided we were in need of a fun crafty afternoon before the long weekend! So I found a bunch of vintage easter images on the web and photocopied them onto colored paper. I brought in some fun patterned paper and we made bookmarks on little strips of bristol board! We even sealed the collage with plain old packing tape! Success!

Materials
  ✄ bristol board 2" x 8" strips
  ✄ Easter images (see below)
  ✄ colored paper
  ✄ patterned paper
  ✄ scissors
  ✄ glue
  ✄ hole punch
  ✄ ribbon

Vintage Easter images to print:


0 commentaires:

DIY crafts

DIY Painted Clutch

16:56 Natalie Karine 0 Comments

Hi there! I recently made good use of a 50% off sale at my local thrift shop and bought a little black clutch purse for a whopping $2.50. I decided to turn it into a fun craft project and paint dome triangles on it! Check it out!

Materials:
    ❣ clutch
    ❣ tape
    ❣ paint
    ❣ paintbrush


1. Find a nice plain clutch that needs some extra sass!

 2. Tape a geometrical pattern on the front

3. Paint

 4. Remove the tape and voilà!

0 commentaires:

School/kids crafts

Valentine's Day in kindergarten

11:14 Natalie Karine 0 Comments


Hi again! I just wanted to show you the fun things we made for mom & dad in class for valentine's day. We did two fun project! "Je t'aime" (that's french for I love you!) heart stamp cards and mini frames with heart fingerprints! so simple but BEAUTIFUL!

Heart stamps cards
     Materials
        ❤ toilet paper rolls
        ❤ paint
        ❤ paint tray
        ❤ cardstock


our handmade toilet paper roll stamps!

A heart with your unique fingerprint!
Mini frame with heart fingerprint
    Materials: 
        ❤ cardstock
        ❤ scissors
        ❤ paint
        ❤ glue
        ❤ mini pospsicle sticks,
        ❤ magnetic strips
        ❤ glitter
        ❤ paper and ink pad


Turned out great! we even stuck magnets on the back
for the fridge!
Thanks for the fingerprint idea Philippe! 

Oh! and the students loved their little squirrel valentines! Check them out here!

0 commentaires:

DIY cards

Popcorn Pillow Back Box

11:07 Natalie Karine 0 Comments


Hi there! It's one of my dearest friend's birthday party tonight and I wanted to make an extra sweet birthday card and giftwrap for him! I love going to see movies with him and sharing some warm cups of coffee over conversation. So I made him this adorable card of two coffee cups holding hands (a drawing i made a while ago) on a popcorn background! I even found this sweet website for paper box templates to print, and made a little matching paper box that i stuffed with candy! Matched with a geeky Star Trek water bottle, it's the perfect gift for an awesome friend!! :)


Materials for paper box:
   ✄ patterned paper
   ✄ pillow back box template
   ✄ scissors
   ✄glue

pillow back box template
I love my coffee and popcorn card!!!
and a personalized envelope too! 
This little guy is hiding behind the card envelope!


0 commentaires:

DIY cards

DIY Squirrel Valentines!

07:41 Natalie Karine 0 Comments

Hi there! Wow is life ever busy jumping around substituting from school to school. Luckily, I just found out that I get to stay in the kindergarten I've been in for the past 3 weeks for a whole other month! YAY! So kids get get ready to learn and have a whole bunch of fun doing it!

Yesterday afternoon, I had a craft urge i just needed to scratch, so I figured that I might as well make these munchkins some valentines... Why not, any chance to craft it up!

xo Happy Valentines Day!


     Materials:
        ♥ Stencil (see below)
        ♥ colored card stock
        ♥ fine black marker
        ♥ glue stick
        ♥ scissors
        ♥ coloring pencils
        ♥ felt hearts
        ♥ heart stamp & stamp pad


Instructions: 1. Cut a square piece of white cardstock. 2. Stamp little hearts all over. 3. Trace and cut out your squirrel (body and tail) and paste onto the cardstock. 4. Add a little felt heart that will turn into a the heart balloon! 5. With a black marker add details: face, hands, balloon rope and border. Draw little fur lines on the tail with a colored pencil.
Voilà! Now you can write a sweet little message at the back!

Squirrel stencil to print

0 commentaires: