School/kids crafts

Paper Pizza!

08:37 Natalie Karine 0 Comments

 Want an easy craft to do with kids that's fun and easy!? PAPER PIZZAS! YUM! Kids loved drawing the tomato sauce, cutting out toppings and pasting on the cheese! We even practiced naming colours, shapes and learned a song about pizza!


Materials:
   ♨ Construction paper
   ♨ Yellow ribbon or yarn
   ♨ Red crayon
   ♨ Glue
   ♨ Scissors


How to make your pizza:
1. Cut out large white circle (dough).
2. Draw sauce with a red crayon.
3. Cut and paste topping (green ovals for olives, red circles for pepperonis, yellow triangles for pineapples, red half-circle for tomatoes, etc...
4. Cut and paste little pieces of yarn or ribbons to make the shredded cheese.


Bellissimo!


I am a Pizza ( by Charlotte Diamond)
I am a pizza
With extra cheese
From tomatoes
Sauce is squeezed
Onions and mushrooms
Oregano
I am a pizza
Ready to go


French version:
Ô, je suis un pizza
Avec du fromage
Beaucoup de sauce
Des tomates
Des oignons, des champignons
Épices mélangées
Je suis une pizza, prête à manger


0 commentaires:

School/kids crafts

Twinkle Twinkle Little Star

08:00 Natalie Karine 0 Comments

FINGER-PAINTING! Kids (and grownups sometimes) looove it. Look at this cute project we did the other day. It was one of my favorite during my July contract at a new school. It's an outterspace collage and the stars are painted with fingers! Cute


What you need:
   ✩ Black, yellow and red construction paper
   ✩ Yellow tempera (washable & non-toxic)
   ✩ Glue
   ✩ Scissors


Step 1: Pre cut moons and rocket ships. Glue
them on the black construction paper.
Step 2 : Dip your fingers in the yellow paint
and stamp your fingers on the paper!


Got a little carried away with the finger painting!

A sea of stars!

So adorable!!!! Kids and the parents loved this project!

Wanna see the other fun crafts I did in July during my special contract?
        * Paper Pizza
        * Friendship Bracelets
        * Super Hero Masks
        * Painting with Marbles


0 commentaires:

Sewing

Button Makeover 2

07:33 Natalie Karine 1 Comments


Hi there!

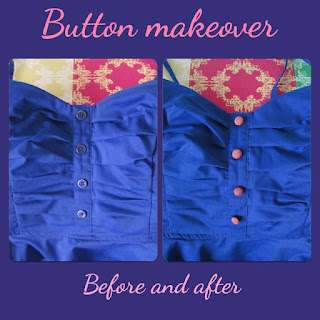
One of my favorite things to do is to change buttons on clothes. It's like creating a whole new article of clothing, by doing the simplest change! MAGIC!

Check out the new pink buttons i installed on my blue dress... so cute!

Oh and this previous Button Makeover post!


Looks great!

1 commentaires:

DIY crafts

DIY Recycled Storage & Paper Boxes

08:20 Natalie Karine 0 Comments

Happy Sunday! I hope you are having a fantastic weekend so far! I decided to have a little bit of a craft afternoon yesterday during a little bit of much needed "me time". I found this great project a while back: Decorated cereal boxes. This is a fabulous craft, made from recycled materials and great for random papers, magazines, odd sized documents... or even if you want to hide certain books in your library! HAH!

Wanna make one?

     Materials:

         ✄ Cereal box
         ✄ Wrapping paper or mac-tac
         ✄ Scrapbooking paper
         ✄ Glue
         ✄ Scissors

Now just follow this simple tutorial and voilà! So pretty!
Looks great in my bookshelf!
Closeup! You can even turn it around to hide the items!


0 commentaires:

School/kids crafts

Superhero Mask Craft!

18:52 Natalie Karine 1 Comments


Today at school, we had a super special guest come visit us: Philippe, creator of the cartoon "The league of Super Evil"! How cool is that?!

The kids got to see some fun clips and ask some questions and then... BAM! We all became superheros by creating our very own Superhero Masks! hurray! Oh and we even made up a superhero dance!

Wanna make one? you'll need:

    ⚡ Construction paper
    ⚡ Ribbons
    ⚡ Pipe cleaners
    ⚡ Hole puncher
    ⚡ Glue
    ⚡ Scissors

You can also download these printable mask patternsfirstpalette.com)

Step 1: Print and cut your template
Step 2: Trace the template on construction paper and cut.
Now you can decorate!
Step 3: Decorate! Draw, glue.... whatever you like!
To finish, add a pipe cleaners on either side to wrap
around the head (you can also use string)!
You can even cut fun superhero shapes like stars and
lightning bolts!

Wanna see the other fun crafts I did in July during my special contract?
        * Paper Pizza
        * Friendship Bracelets
        * Painting with Marbles


1 commentaires:

DIY cards

Golfer's Birthday Card!

09:44 Natalie Karine 1 Comments

Step by step collage

Tuesday is my dad's birthday....perfect time for one of my favorite crafts: Handmade birthday cards! Since my dad loves golfing I decided to do a golf theme!
And check out the cute flag.... Guess how old he's turning!?

I love wrapping gifts! Can't wait to give my dad his birthday gift!

1 commentaires:

DIY crafts,

Friendship Bracelets!

15:50 Natalie Karine 0 Comments


I remember spending afternoons making friendship bracelets as a kid! So what a great activity to do with kids at school! They are still wearing them a couple days later.... And I'm still wearing mine too! Wanna make some? Check out these great tutorials I found online! Summer bracelets DIY and Diagonal Friendship Bracelet


You can also do a simple version (easier for young kids age 4-7) where you take 3 strings, tie a knot and twist tightly. Then you just tie it around a wrist (without letting go) and voilà!


What you'll need:
 ✄ scissors
 ✄ embroidery thread
 ✄ safety pin or tape

I even found an old book I still had from years ago!

0 commentaires:

School/kids crafts

Painting with Marbles!

16:23 Natalie Karine 0 Comments


I'm working at a new school for the month of July and wanted to share a fun project we did the other day.... Painting with marbles!

   What you'll need:
    ✪ marbles
    ✪ tempera paint
    ✪ bowls
    ✪ spoons
    ✪ construction paper
    ✪ medium cardboard box
    ✪ masking tape
What you need to do: Tape a piece of construction paper (or any paper, really) to the bottom of a cardboard box. Pour some paint out in a bowl and drop the marbles in it. With a spoon, take a marble (covered in paint) out of the bowl and drop it in the box. Move the box around so that the marble travels along the paper and watch the cool traces it leaves behind. Repeat with another colour and voilà!

0 commentaires:

DIY cards,

Thank You Apple Cards!

07:41 Natalie Karine 1 Comments


Last week was the last week of school! I wanted to thank all my students for the most wonderful year ever, so I decided to make little cards. However, I didn't have as much time as I usually have, so I decided to take these cute little apple cards I found and add some handmade touches instead! Here they are!

Perfect for or from a teacher!

xo

Inspired from simple apple cards found at the Dollar store!
Materials: black marker, glue, colored paper, cards, scissors
Step by step: ① Find a fun pre-made card (mine's a cute apple!) ② Draw things directly on it ③ Draw li ttle extra's on coloured paper. ( my bubble says Merci! - that's thank you in French!) ④ Glue your little extra drawings! Voilà!
I even added a little personalized message inside...
with another worm!

1 commentaires: